How to Encrypt an External Hard Drive or USB
External hard drives, flash drives (USB), and memory cards, all these devices make data backup and sharing super easy.
They are becoming more valuable as modern schooling, work, and life is overflowing with data.
- What encryption is and how it works
- How encryption will protect data on your external storage devices
- How to encrypt data on an external hard drive
- How to encrypt an external hard drive or USB on Windows
- How to encrypt an external hard drive or USB on macOS
- How to encrypt an external hard drive or USB on Linux
- Advantages and disadvantages of encrypting your external drives
Thanks to their high capacity, small size, and portability, they are great options for transferring or viewing data from one PC to another. However, what will happen if you lose or misplace any of these devices?
In many cases, it will result in a data breach. These data breaches can be avoided if you encrypt your external hard disks or USB drives.
When encrypted, it’s challenging for hackers to access the data these devices contain if they get stolen or misplaced.
This guide will show you how to encrypt an external hard drive or USB flash drive.
While devices like external hard drives, USB flash drives, and memory cards offer convenient solutions for backing up and sharing data, they also pose significant security risks if lost or misplaced, potentially leading to data breaches.
Encrypting these devices is a powerful measure to safeguard your information. By encrypting your external hard drives and USB drives, you ensure that unauthorized individuals cannot access your data if the devices are lost or stolen.
This guide will walk you through various methods for encrypting external hard drives and USB flash drives, helping you secure your valuable data.
How does Encrypting an External Hard Drive or USB Work
Encrypting an external hard drive means making it secure by encrypting the data stored using sophisticated mathematical functions. This can be done by using software or some other way.
After disk encryption, the data on the external hard drive cannot be accessed by anyone who doesn’t own the relevant key or password.
It provides security to your external hard drive against hackers and other online threats. The primary purpose of encrypting external hard drives is to protect their data from unauthorized persons.
AES or Advanced Encryption Standard
The Advanced Encryption Standard (AES) is one of the widely used global standards for encryption. It was established by the United States National Institute of Standards and Technology (NIST) in 2001.
The objective of AES is to provide a specification for electronic data encryption. It is a symmetric block cipher, which means that the same key is used for disk encryption and decryption.
Why should you encrypt your external hard drive or USB?
While external hard drives and USB sticks are beneficial when transferring or viewing data from one machine to another, they may be lost.
If they are not encrypted, there is a high risk of exposing your sensitive information to unauthorized people in such situations. Therefore, you should encrypt them, especially when they contain sensitive or personally identifiable information.
On the other hand, some data protection regulations like the GDPR or HIPAA are mandatory to follow if you are a business or a company user. According to them, you will have to pay costly fines if your data is not encrypted.
Even if these regulations do not constrain you, it is still vital to encrypt your external storage devices to prevent data breaches that could cause severe damage to your company.
This article will learn how to encrypt your hard drive / USB using various methods.
Also check out our article on how to encrypt your internet traffic for further security tips.
Ways to Encrypt Your External Hard Drive or USB
In this segment, I’ll show you how to encrypt your external drive.
Most modern operating systems such as Windows, macOS, and Linux have built-in tools for encrypting your external hard drives or USB peripherals. For instance, you can use BitLocker for Windows, FileVault for Mac, and LUKS (Linux Unified Key Setup-on-disk-format) for Linux to encrypt your USB drives.
Encrypting External Hard drive in Windows
Go through the following steps to encrypt an external hard drive in Windows using BitLocker.
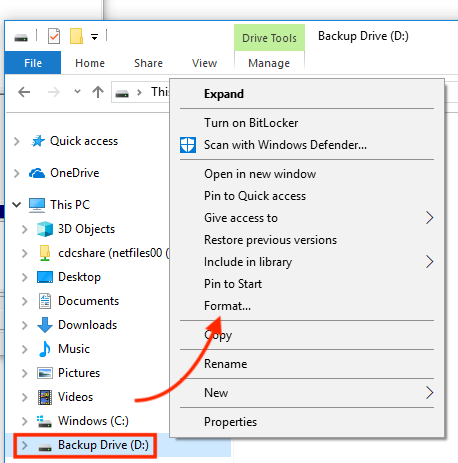
Step 1: Open the Windows Explorer and right-click on your external hard drive. Then click Format.
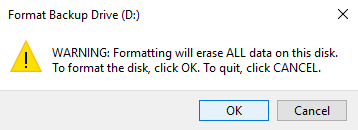
Step 2: The above step will completely erase all the data on your external drive. If it is acceptable for you, click OK.
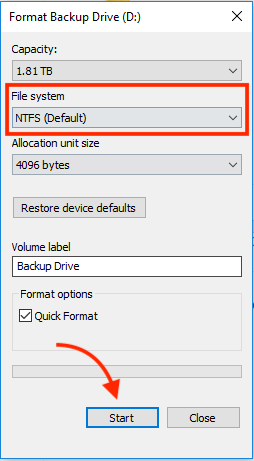
Step 3: The following window will popup. Ensure that the selected drop-down option under File System is NTFS, and then click Start.
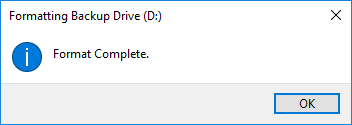
Step 4: Once the drive has been formatted successfully; the following message will popup. Click the “OK” to continue with the next steps.
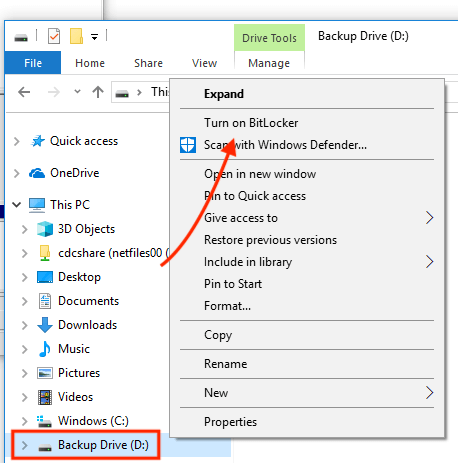
Step 5: Open the Windows Explorer again and right-click your external hard drive. Then select “Turn on BitLocker” from the list of options.
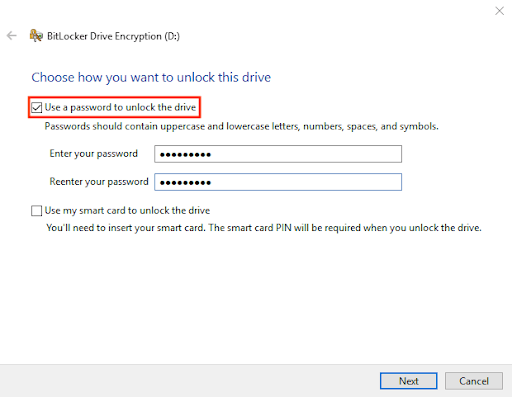
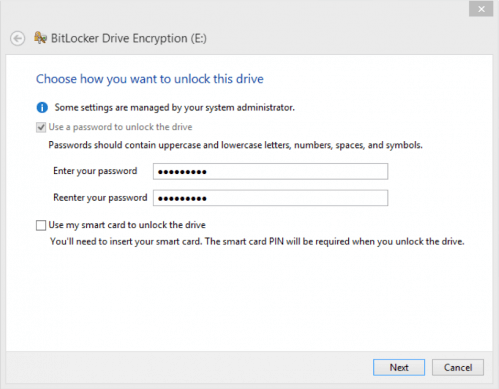
Step 6: Tick the “Use a password to unlock the drive” option in the window that appears and also enters a strong and memorable password there as required. Then click “Next.”
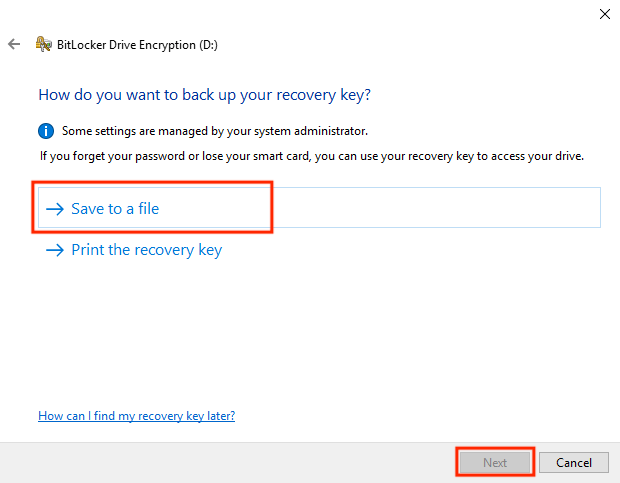
Step 7: Click “Save to a file” on the next window and choose the location to save the recovery key. This recovery key will be useful to access the drive-in case you forget your password.
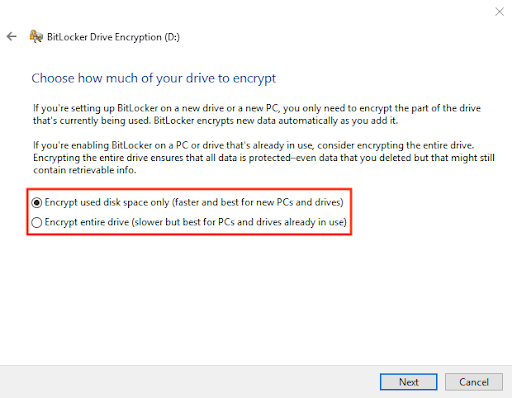
Step 8: Read through the text in the below window. Then select the preferred disk encryption option and click Next.
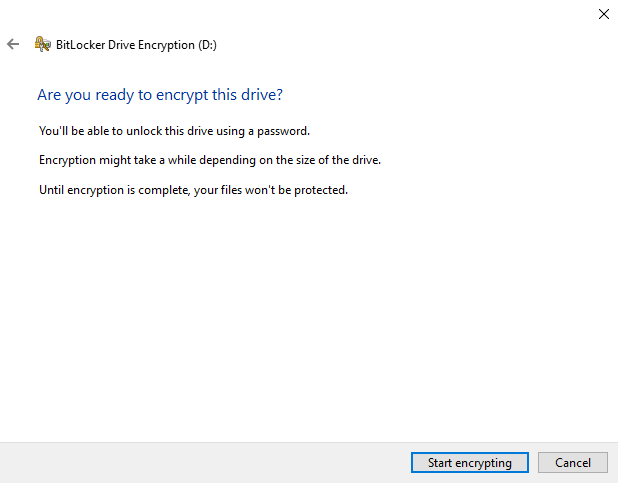
Step 9: Click on “Start encrypting.”
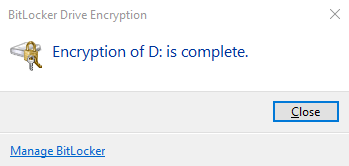
Step 10: Finally, you will have to wait until the encryption is completed, and then click “Close.”
Encrypting External Hard Drive in macOS
The steps are to encrypt an external hard drive on macOS using FileVault.
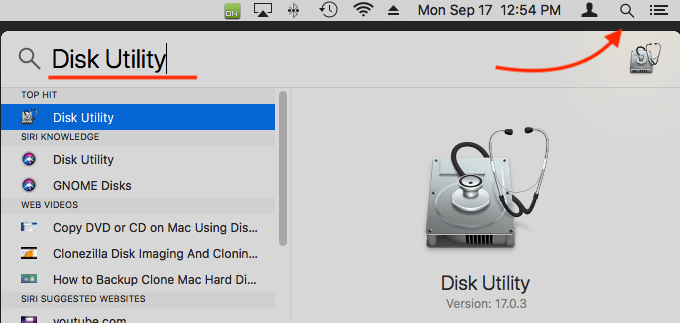
Step 1: First, Open the finder and get the Disk Utility by typing “Disk Utility” there and pressing enter. Then the Disk Utility application will start as shown below.
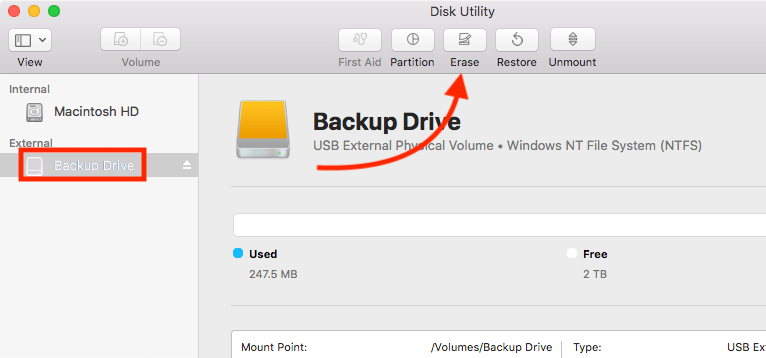
Step 2: Select your external drive in the Disk Utility and then click “Erase.”
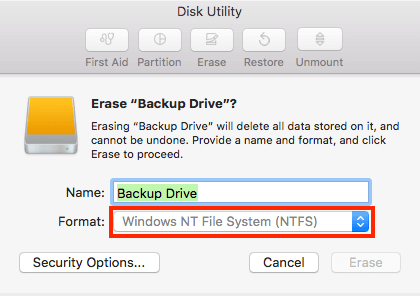
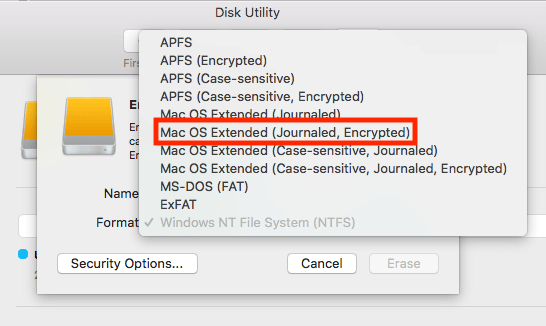
Step 3: Click the Format drop-down and select Mac OS Extended (Journaled, Encrypted) or APFS (Encrypted) from the list of available formats.
Then:
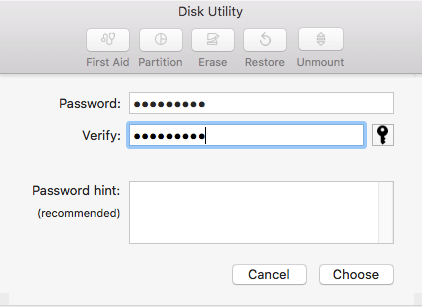
Step 4: Enter a strong and memorable passphrase and the passphrase hint as required, then click “Choose,” and after that, click “Erase.”
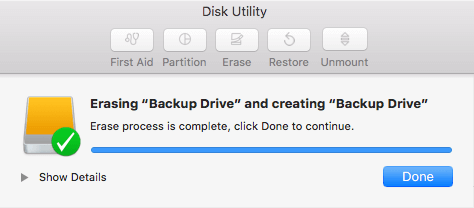
Step 5: Now, the drive should be formatted for FileVault as required.
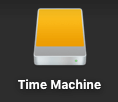
Step 6: Now comes the step of encrypting the drive for FileVault. You will be able to notice an icon on your desktop that looks similar to the below images.
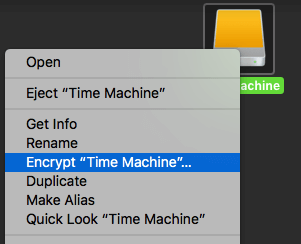
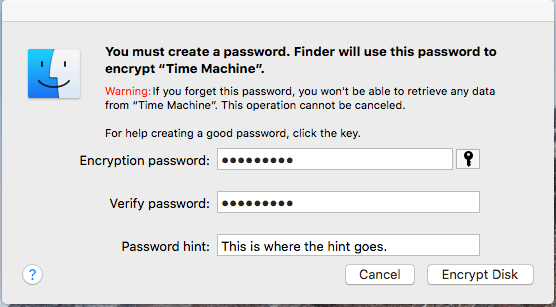
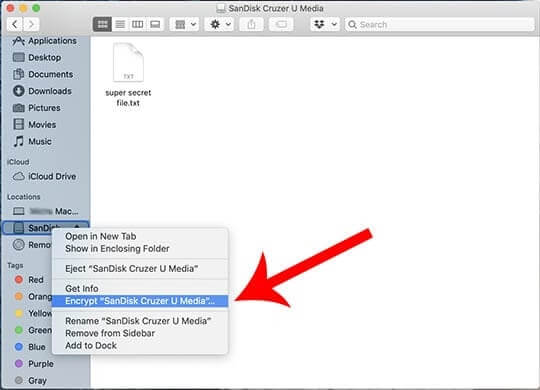
Step 7: Right-click on the icon of the external drive you need to encrypt and then click on the option called Encrypt “Time Machine,” as shown below.
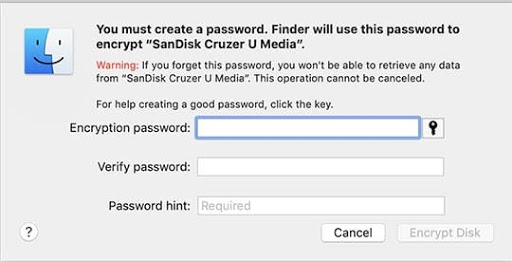
Step 8: Enter a strong and memorable password and enter the password hint as required. After that, click Encrypt Disk.
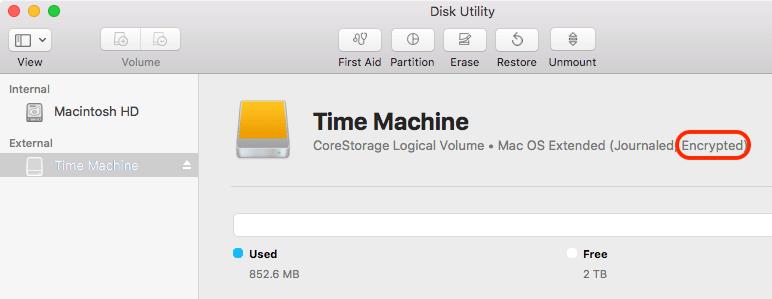
Step 9: Finally, the drive will proceed through the encryption process. Select and check the drive in the Disk Utility to make sure it’s successfully encrypted.
Encrypting External Hard Drive in Linux
There are many ways to perform encryption in Linux. Below are the steps to encrypt your external hard drive in Linux with a Raspberry Pi.
Step 1: Connect your hard drive to the system and run the following command.
sudo fdisk -l
Step 2: Use the command below to shred the hard drive if it is a traditional spindle drive and there is data.
sudo shred -v -n 1 /dev/sda
Step 3: Run the following command to wipe out existing partitions and begin with a new, single primary section.
sudo fdisk /dev/sda
Step 4: You’ll be asked several questions within the fdisk tool. Provide answers to them appropriately, and you will automatically exit the fdisk tool. Now run the following command.
sudo mkfs.ext4 /dev/sda1
Step 5: Make a note of your UUID, as it will be needed for mounting the encrypted drive later. You can use blkid to find it, as shown below.
sudo blkid
Step 6: If you haven’t installed the crypto tool yet, run modprobe at the end to load the required modules without a restart.
sudo apt-get install cryptsetup
sudo modprobe dm-crypt sha256 aes
Step 7: Now, set up your encrypted drive. You will have to enter a passphrase for that. Note it down somewhere secure as you will need it later to access your encrypted data or configure your encrypted hard drive.
sudo cryptsetup –verify-passphrase luksFormat /dev/sda1 -c aes -s 256 -h sha256
sudo cryptsetup luksOpen /dev/sda1 YourPreferredName
The above code will create a mapper that recognizes your encrypted volume, and in this instance, it is named “YourPreferredName.”
Hard Drive Encryption with Third-Party Hard Drive & Disk Encryption Software
Another way you can use to encrypt your hard drive is by using third-party encryption software or encryption tool. Below are some of the most popular third-party encryption software used for hard drive encryption.
VeraCrypt
VeraCrypt is a very popular program that often gains the highest ratings from users. VeraCrypt is a free and open-source encryption software used on Windows, Mac OS X, and Linux. It provides enterprise-grade security to all your important data.
AES Crypt
AES Crypt is a convenient encryption program with both free and paid versions. It comes with a password manager and a collaboration feature, enabling sharing of encrypted data with others. AES Crypt is available for Windows, macOS, and Linux, while third-party versions are for Android and iOS.
AxCrypt
AxCrypt is a very powerful and reliable encryption software specially designed for individuals and small business teams. With AxCrypt, files can be protected with 128-bit or 256-bit AES encryption. It comes with all the tools to secure files inside external hard drives.
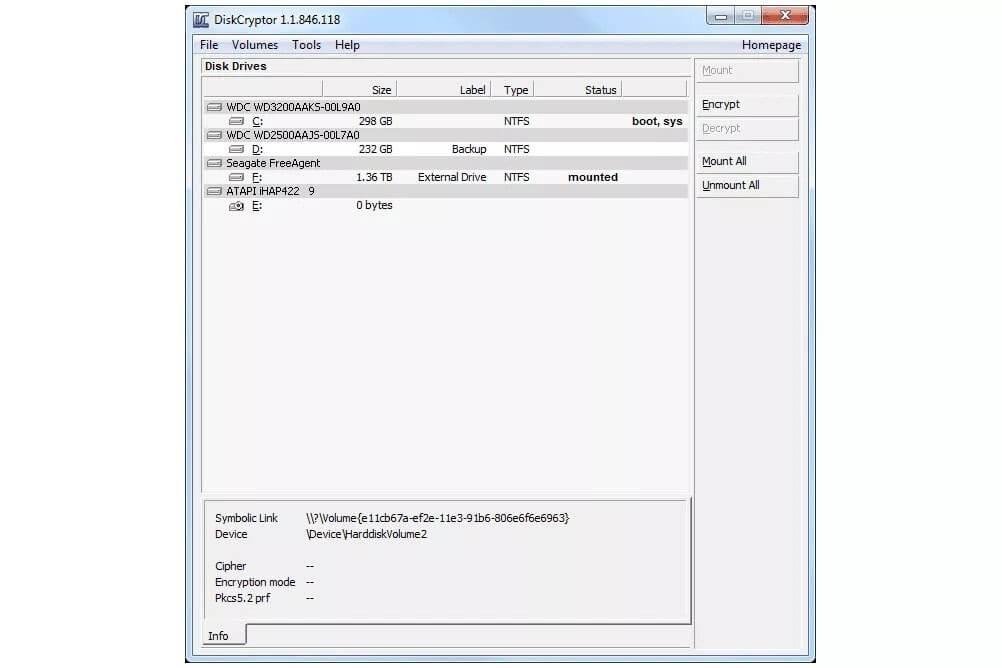
DiskCryptor
Diskcryptor is one of the best open-source data encryption solutions for Microsoft Windows. It enables encryption of entire hard drives or individual partitions. DiskCryptor supports many encryption schemes, Windows operating systems, and file systems. An impressive feature of DiskCryptor is that it allows you to pause encryption and resume it later or even on a different computer.
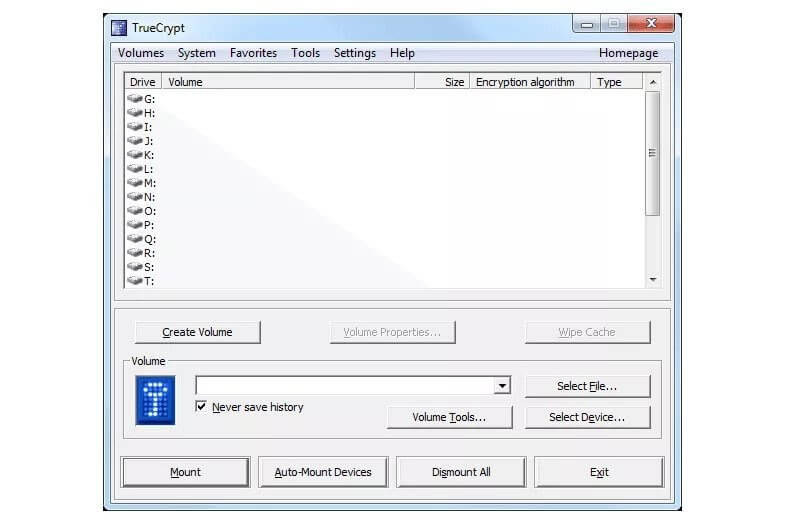
TrueCrypt
TrueCrypt is powerful encryption software supporting hidden volumes, on-the-fly encryption, key files, and keyboard shortcuts. It can be used on entire disks, and system partitions with an OS installed.
Moreover, TrueCrypt can be used to create a single file that works as a drive, concluded with its encrypted folders and files. TrueCrypt supports Windows 10, 8, 7, Vista, XP and Linux, and macOS.
Hard drives with hardware-based encryption
These devices normally use software and hardware-based encryption, which sometimes requires setting a password on a physical keypad to secure your data. But, they also depend on proprietary code, which makes it difficult to verify their security claims.
It is impossible to ensure if the hard drives with hardware-based encryption have backdoors or not, and this is common for any hardware. Therefore it is vital to purchase hard drives from only trusted vendors or brands.
USB Encryption with Operating Systems
Here you will learn how to encrypt your USB flash drive.
Encrypting USB drives in Windows
Follow the below steps to encrypt a USB flash drive in Windows OS using BitLocker.
Step 1: Connect your USB drive to your Windows PC and open file explorer. Right-click on your USB Drive there and click “Turn on BitLocker.”
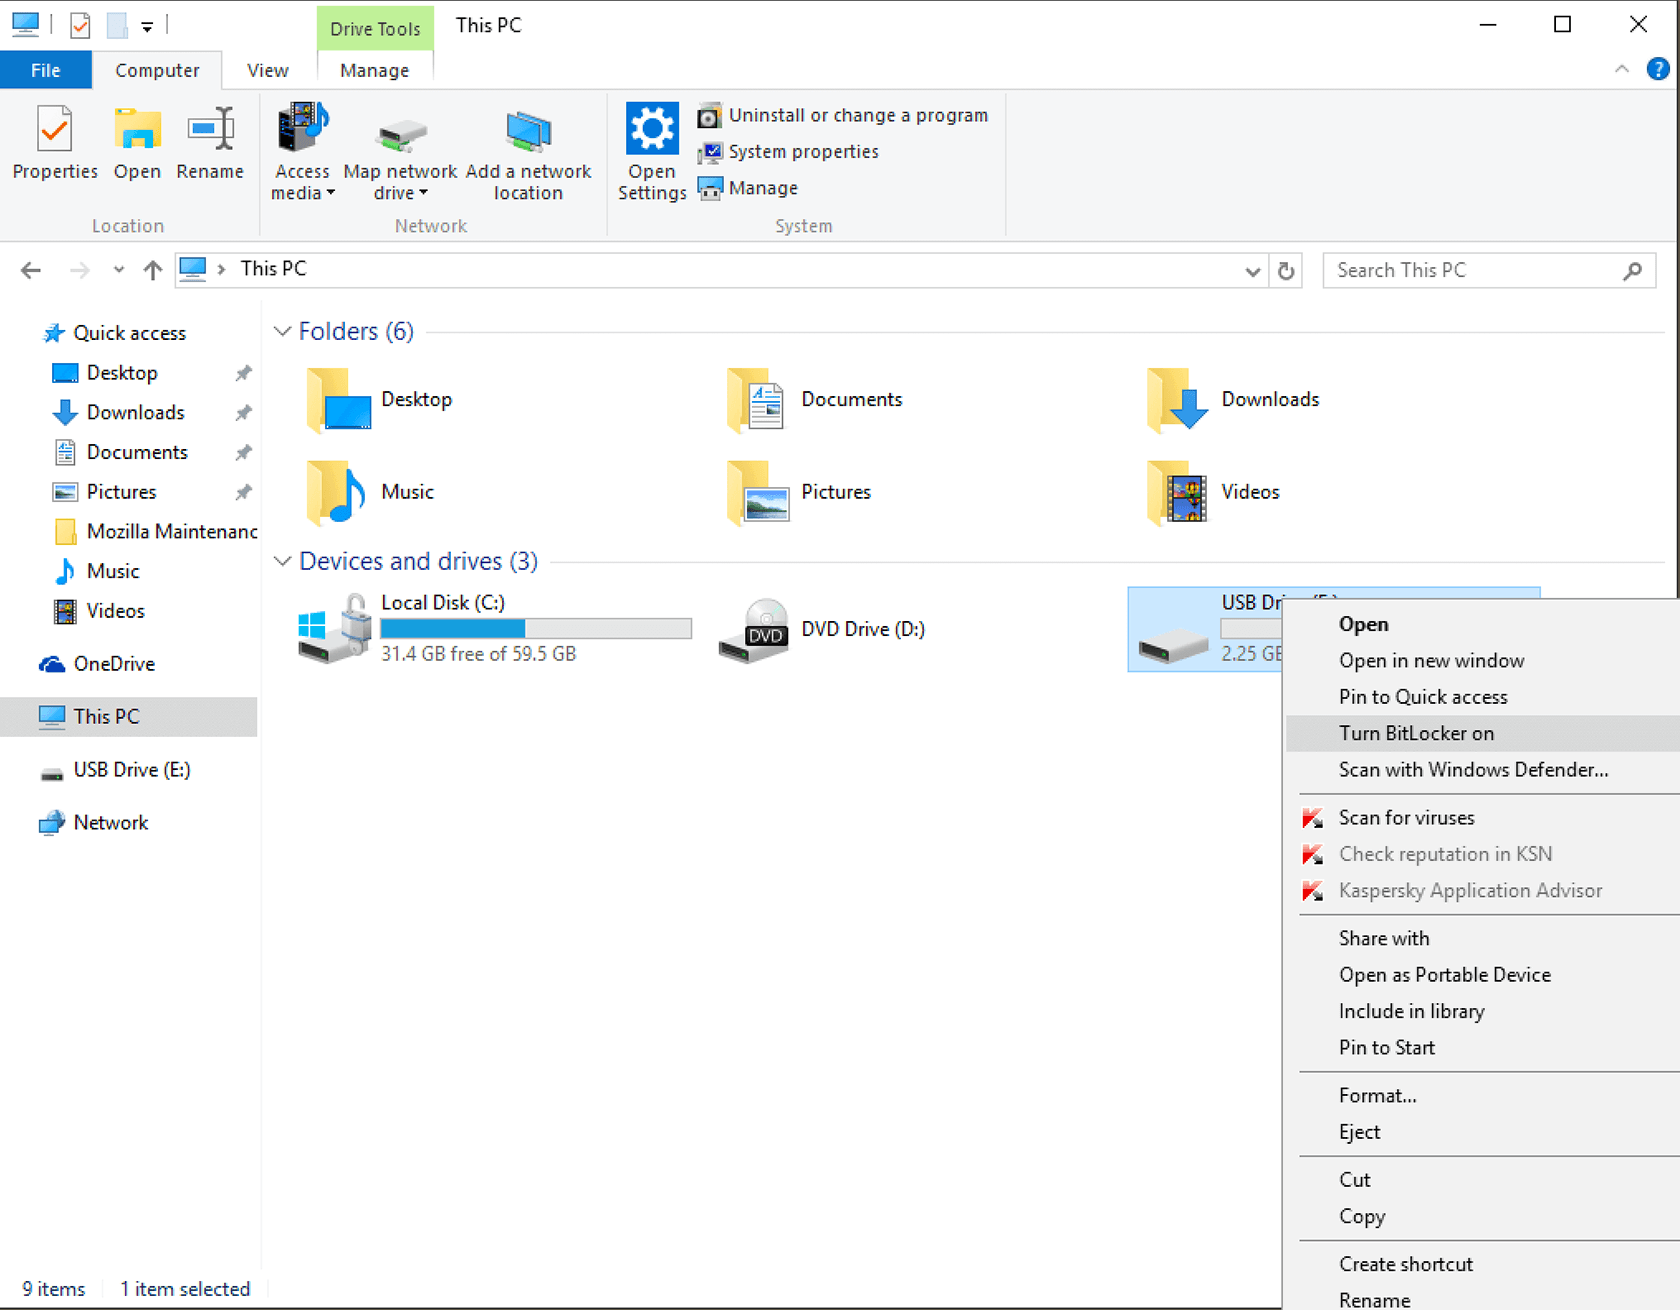
Step 2: Here, you will be prompted to select the way you like to unlock the drive. Tick on “Use a Password to Unlock This Drive” there, as shown below.
Step 3: Enter and confirm your password in the provided spaces of the above window to unlock the drive (You may be able to change this password later by giving the original password).
Step 4: When asked, “How Do You Want to Store Your Recovery Key,” Select the “Save the Recovery Key to a File” option. Save this recovery file in a secure location only you have access to (This file will not contain your password and can be used if you forget your password).
Step 5: Make the selection to encrypt the whole drive or encrypt only the used space.
Step 6: Finally, Windows will successfully encrypt your USB flash drive. This process will take only a few minutes, and a message will appear once the encryption is completed.
Encrypting USB drives in macOS
As you may already know, macOS has some built-in tools for USB encryption integrated into its software. They allow you to encrypt or decrypt USB Flash drives and other storage devices on the fly. Below are a few simple steps on how to use them.
This process uses XTS-AES encryption, the same type of encryption the macOS FileVault 2 system uses. It’s important to remember that using Finder to encrypt a USB Drive will limit its usage to macOS.
You won’t be able to access the drive on a machine with a different OS like Windows or Linux.
Step 1: Plug your Flash Drive into your MAC PC and open Finder. Then, right-click on the USB Drive in the left sidebar and click on “Encrypt +Name of the USB drive,” as shown below.
Having all the necessary fields filled in, click on “Encrypt Disk.” Step 2: Now, Finder will prompt you to enter a password and a hint. This password will be used to access the USB drive later, so don’t lose it.
Step 3: Finally, the Finder will encrypt your Flash drive. This process may take a while, depending on the amount of data stored.
Encrypting USB drives in Linux
Following are the steps to encrypt your USB drive using LUKS in Linux.
Step 1: See the available filesystems using the below command.
df -hl
Step 2: Connect your USB Drive to the PC.
Step 3: Identify the newly connected device using the following command.
df -hl # in my case it was /dev/sdb1
Step 4: Unmount the USB drive with the below command.
umount /dev/sdb1
Step 4: Unmount the USB drive with the below command.
umount /dev/sdb1
Step 5: Wipe the filesystem from the USB drive.
sudo wipefs -a /dev/sdb1
Step 6: Create a LUKS partition as below.
sudo cryptsetup luksFormat /dev/sdb1
WARNING!
========
This will overwrite data on /dev/sdb1 irrevocably.
Are you sure? (Type uppercase yes): YES
Enter passphrase:
Verify passphrase:
Step 7: Open the encrypted drive with the below commands.
sudo cryptsetup luksOpen /dev/sdb1 reddrive
Enter passphrase for /dev/sdb1:
ls -l /dev/mapper/reddrive
lrwxrwxrwx 1 root root 7 Jul 26 13:32 /dev/mapper/reddrive -> ../dm-0
Step 8: Create a filesystem as shown below. Here, “EXT4” is the filesystem, and you can create any other file system you need.
sudo mkfs.ext4 /dev/mapper/reddrive -L reddrive
Step 9: Using the encrypted USB
Below is the code for mounting and unmounting your encrypted USB Drive in Linux CLI.
sudo mount /dev/mapper/reddrive /mnt/red
su -c “echo hello > /mnt/red/hello.txt”
Password:
ls -l /mnt/red
total 20
-rw-rw-r–. 1 root root 6 Jul 17 10:26 hello.txt
drwx——. 2 root root 16384 Jul 17 10:21 lost+found
sudo umount /mnt/red
sudo cryptsetup luksClose reddrive
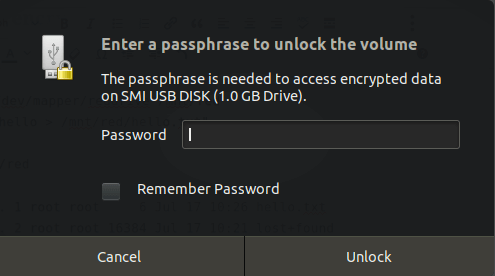
If you use the GUI to access the encrypted USB, a screen like this would appear.
Enter your password there, then save your data in the USB and eject it safely.
What are the Advantages of Encrypting External Hard Drives?
Below are some of the advantages you can gain through encrypting your external hard drive.
Improved data security
A complete data encryption solution allows business owners to carry on their work with peace of mind as their data is secure and protected in all states.
Using the right encryption method will ensure that your data is almost inaccessible to hackers or unauthorized people. Even if hackers created brute-force software to crack the encryption, it wouldn’t be easy with a powerful encryption solution.
Ability to maintain data integrity
Despite their size, most companies worry if their data will sustain integrity if they are encrypted. Encryption protects your data from modifications and thereby helps maintain its integrity and privacy. It prevents hackers from modifying data who try to commit data fraud by altering data.
Alignment with data compliance rules
Compliance is an important aspect to consider when dealing with data, as many companies are bound by legal, insurance, and industry constraints on how data can be transferred and controlled.
Encryption provides an excellent opportunity for businesses to transfer and store data while adhering to compliance rules that currently take place in their organizations, such as HIPAA, PCI/DSS, FIPS, and FISMA.
Ability to transfer data securely
Mostly, the data becomes unsafe when transferred from one place to another. Even though SSL/TSL is the industry standard for transferring data, it can have some drawbacks in terms of data security.
A good data encryption solution will ensure the safety of data at rest and in the state of being transferred.
What are the Disadvantages of Encrypting External Hard Drives?
While encrypting hard drives offers you many advantages, it also has some downsides. Some drawbacks of encrypting external hard drives are as follows:
Need for Cooperation
Using external hard drives shared between multiple people risks data loss or theft. Since many people know the password, they may share it with others who are not authorized to access the drive. Therefore, if you are sharing encrypted drives, you must cooperate with those who have access to the drive, or your data will no longer be safe.
Forgetting Passwords
To encrypt your external hard drive, you need to add a password to it. This password will be required whenever you want to access or decrypt the drive. Some people use complicated passwords to strengthen security and make it difficult for others to guess. However, sometimes they forget these passwords and cannot access the drive anymore.
Conclusion
External hard drives and USB drives play a significant role in storing and retrieving data. They come with increased capacity with decreased size and price and now even offer some advanced solutions to protect your data.
Encryption is the key to securing the data on your external hard drives/USBs. By referring to the encryption methods explained in this article, you can select an encryption option that suits your needs and prevent hackers or whoever finds your portable drive from accessing the information easily.
Frequently Asked Questions
Some people found answers to these questions helpful
Does a whole disk encryption slow down your PC or Mac?
Full disk encryption should have near negligible performance costs. Most modern computers and OS offer full encryption with nearly no impact on performance.
How can you password protect a single folder in your external hard disk without installing any software?
Generally, you can’t. It would help if you had software installed on the computer you’re busing the external hard disk. BitLocker or FileVault can encrypt separate folders.
How do you lock an external hard disk with a password without BitLocker or any other software?
After formatting it, you can encrypt a hard drive natively in your OS. In macOS, you can use Disk Utility to wipe the external hard drive and then format it with encryption.
How long does it take to encrypt a hard drive?
This depends on the system you’re using, the storage capacity of the hard drive, and whether it’s an HDD or SSD. Generally, this process should take a few minutes to a maximum of a couple of hours on mos systems.


2 Comments
Gary Evans
May 15, 2023 5:10 pm
I noticed that you formatted the drive before turning on BitLocker. Were you just assuming that it was a new drive? There’s no danger of data loss if BitLocker is turned on with a drive that is already in use is there?
Michael L. Wright
February 17, 2023 5:07 pm
Thank you for the step by step guide that you have provided. It clear and to the point.