Port Forwarding 101 — Everything You Want to Know
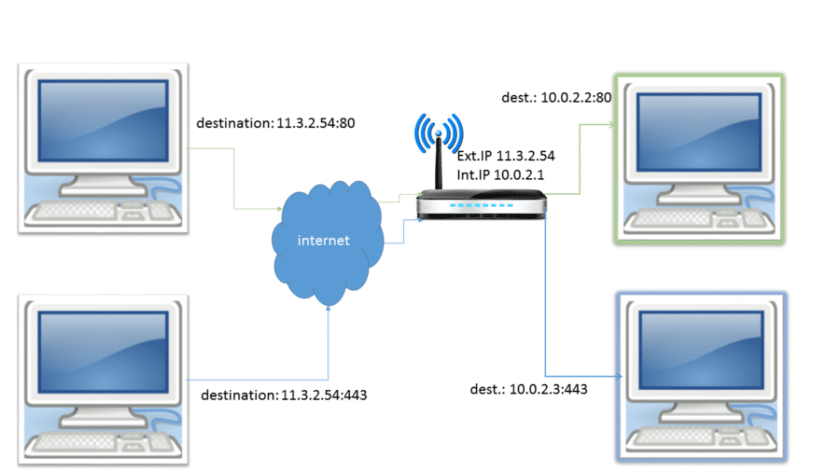
What is port forwarding? In simple terms, it’s forwarding internet data from one port to another. And when do you need it? When you need to allow incoming connections from a WAN (internet) to reach a specific device/port on a LAN (a private network).
Let’s break this down a little further…
- When you connect to the internet, you use a public IP given by an ISP to the router.
- Your computer, connected to the router, has a private IP address that can’t be used to connect to the internet.
- Your computer has to communicate through the router when connecting to the internet. The router fetches the data from the internet and forwards that data to the local device.
- Your computer receives this data for certain processes or functions. Each one has an identification number called a port. There are around 65,000 ports. (A popular port is 443 for HTTPS traffic.)
- The port number is added to the end of the device’s IP to send and receive data. This port is also considered when your computer receives data from the internet. That’s why this process is called port forwarding.
- VPN port forwarding is similar to the above process. The VPN will be an interface between your computer and the internet without allowing you to connect to the internet directly.
- A popular VPN port forwarding use is bypassing the NAT firewall. Some VPN services use a NAT firewall to protect customers from malicious internet connections. Although it keeps you secure, a NAT firewall can also block incoming connections you want.
- If a VPN offers port forwarding, it can be used to reroute incoming connections so that they bypass its NAT firewall. If you use port forwarding when torrenting, you can access resources that would otherwise be blocked by the VPN server.
Check out our guide on VPN tethering for more related information.
It provides a comprehensive walkthrough for implementing port forwarding on a Wi-Fi router and via a VPN, highlighting the advantages of integrating port forwarding with PureVPN. The manual also evaluates the merits and drawbacks of employing port forwarding, both with and without the aid of a VPN.
Additionally, it elaborates on the various categories of port forwarding: local, remote, and dynamic. The manual concludes by examining the potential hazards associated with port forwarding and strategies for their mitigation.
Real-World Uses of Port Forwarding
There are many real-world scenarios where port forwarding is extremely useful for everyday activities. Some are listed below:
- Checking on your baby from the office via a baby monitor at home
- Watching security camera footage when you’re away from home
- Allowing users to connect to a public webserver you’re hosting
- Accessing your home computer through remote desktop software
- Forming a direct connection to a gaming server
- Connecting to an IoT device controlled at your home network
- Maintaining uninterrupted direct access to a VoIP call server
- Accessing services on a Synology NAS or a Plex
- Recovering lost router passwords
- Accessing restricted websites
- Enhancing security protection against any DDoS attacks
- Setting up servers, like TeamViewer, at home
Step-By-Step Guide to Set Up Port Forwarding with a Wi-Fi Router
For port forwarding, you generally need a Wi-Fi router. This process may vary depending on what brand of router you use, but the basic steps should be similar.
Step 1
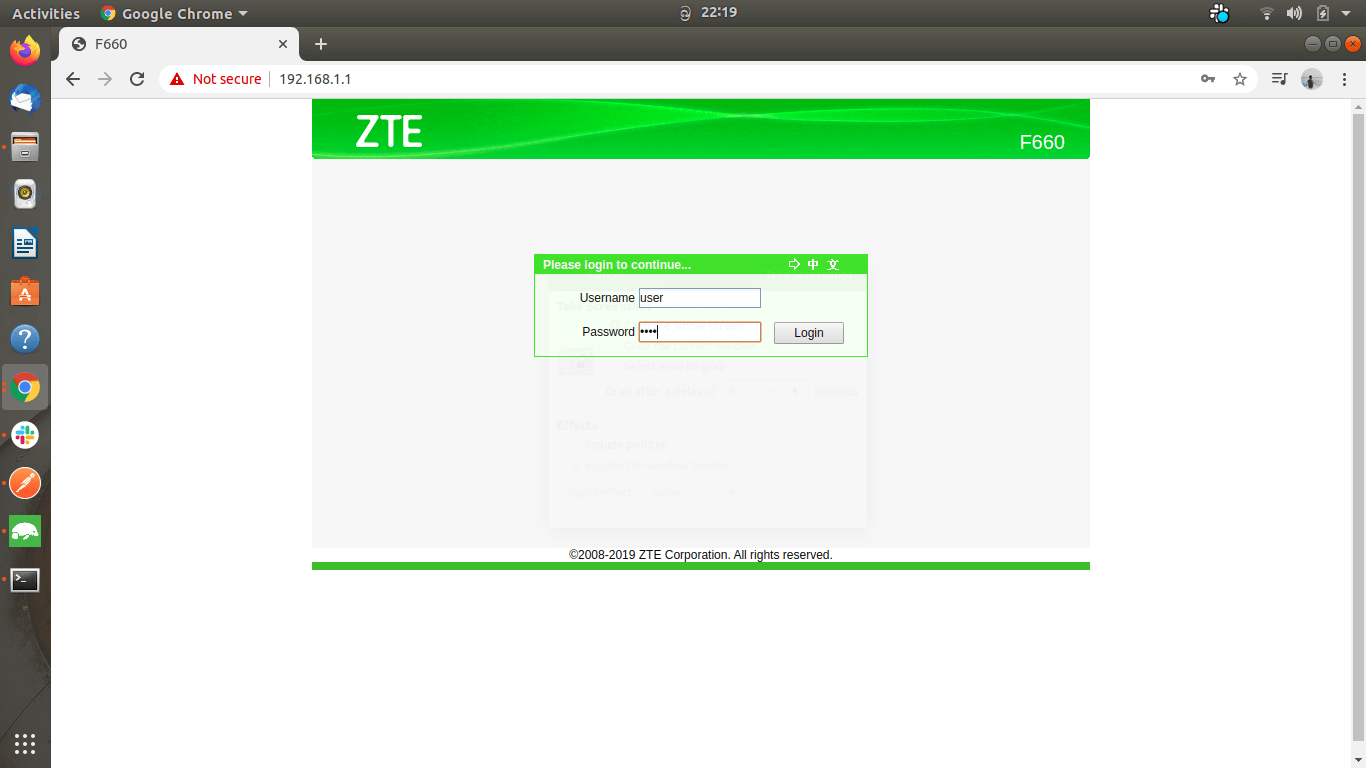
First, connect to the router and navigate to the admin panel. Usually, you can do this by entering 192.168.0.1 or 192.168.1.1 as the URL of your browser’s address bar.
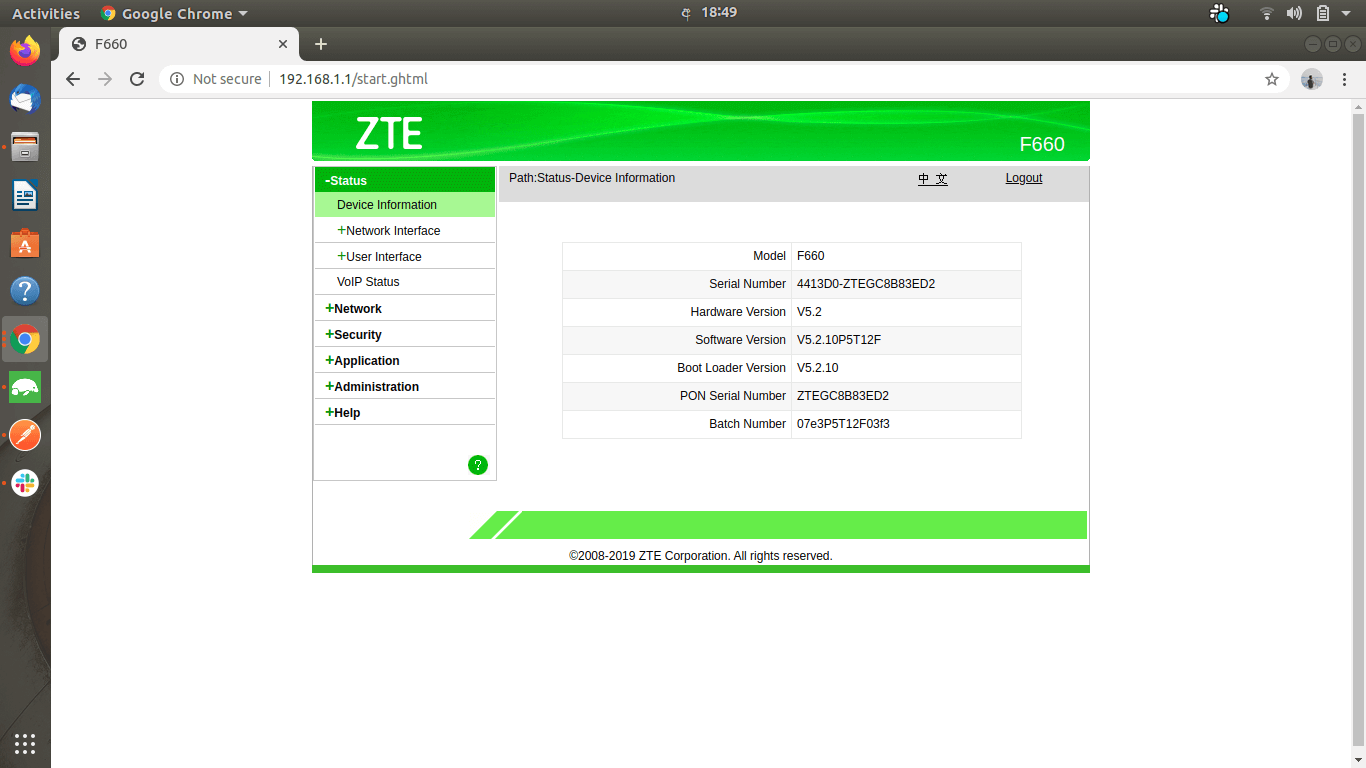
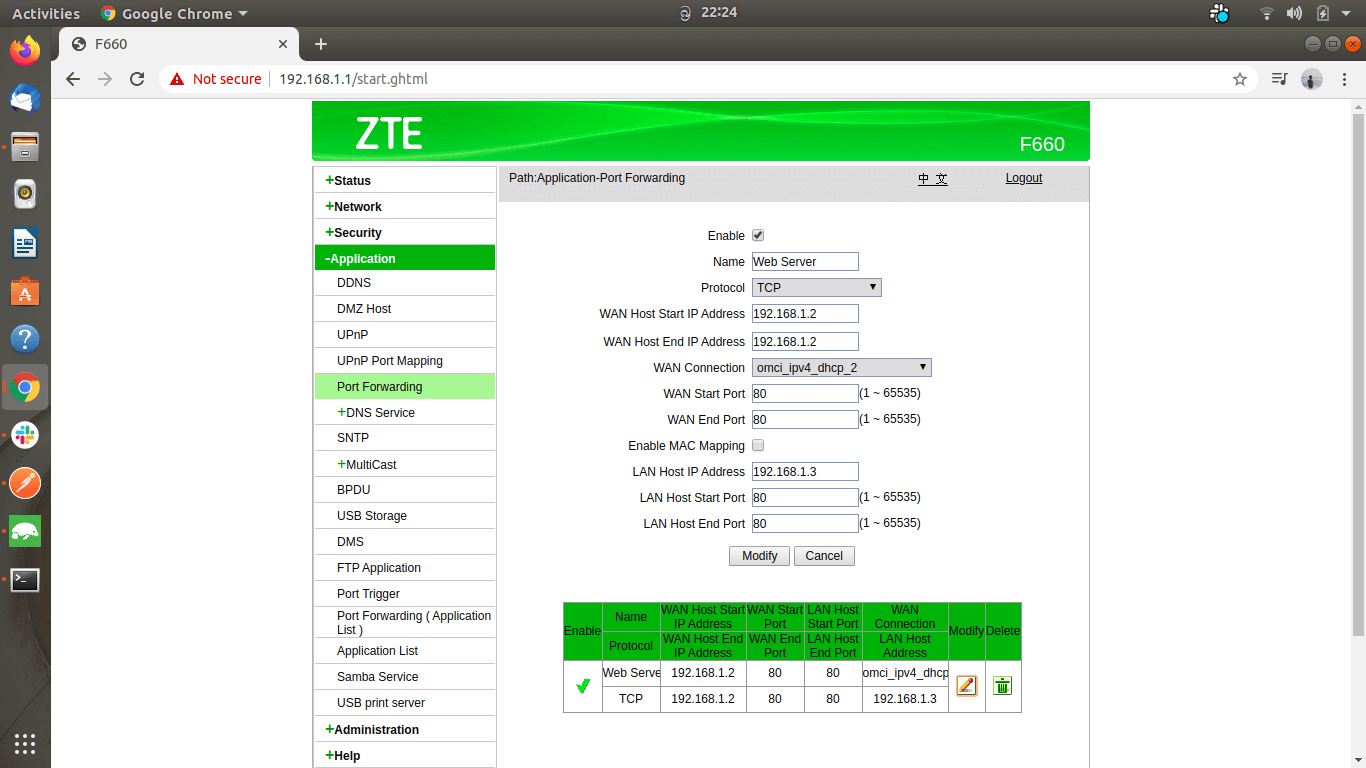
After you log in, you’ll see an interface similar to this:
Step 2
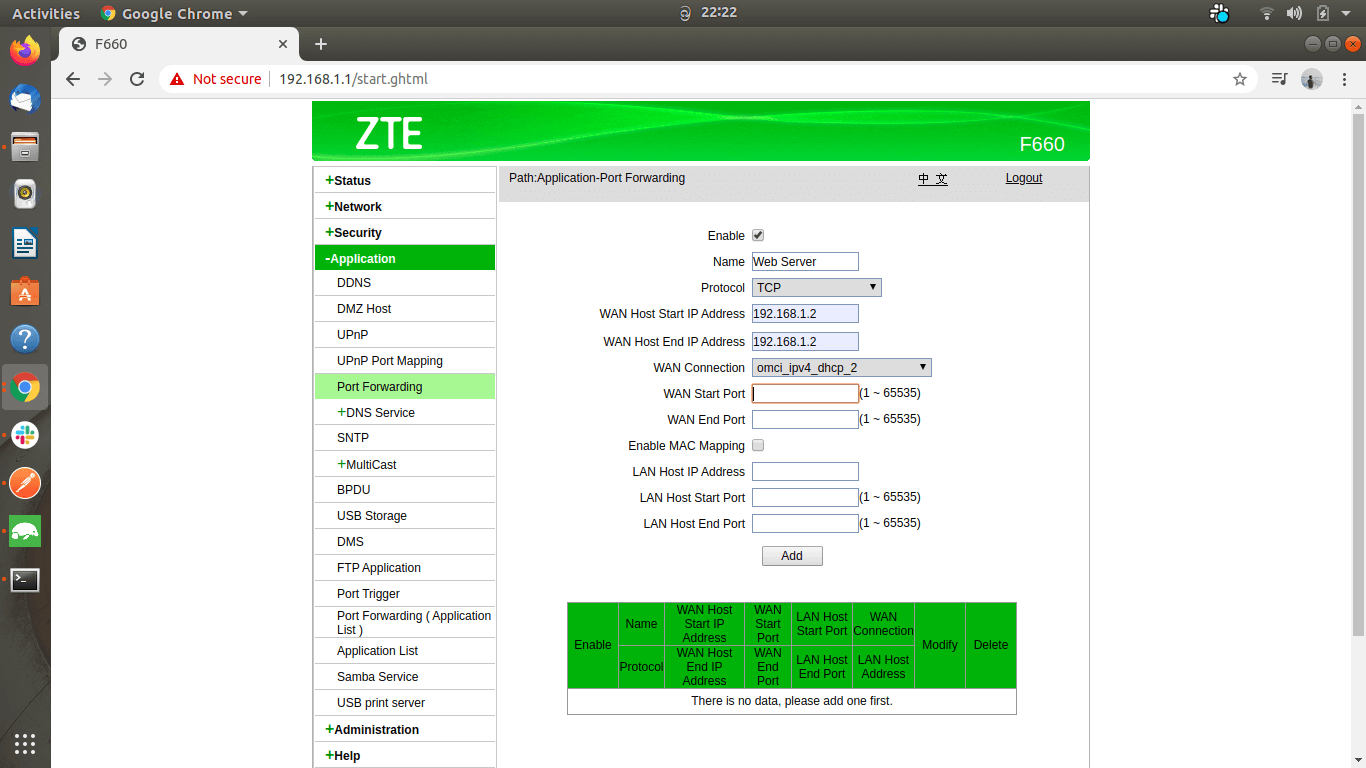
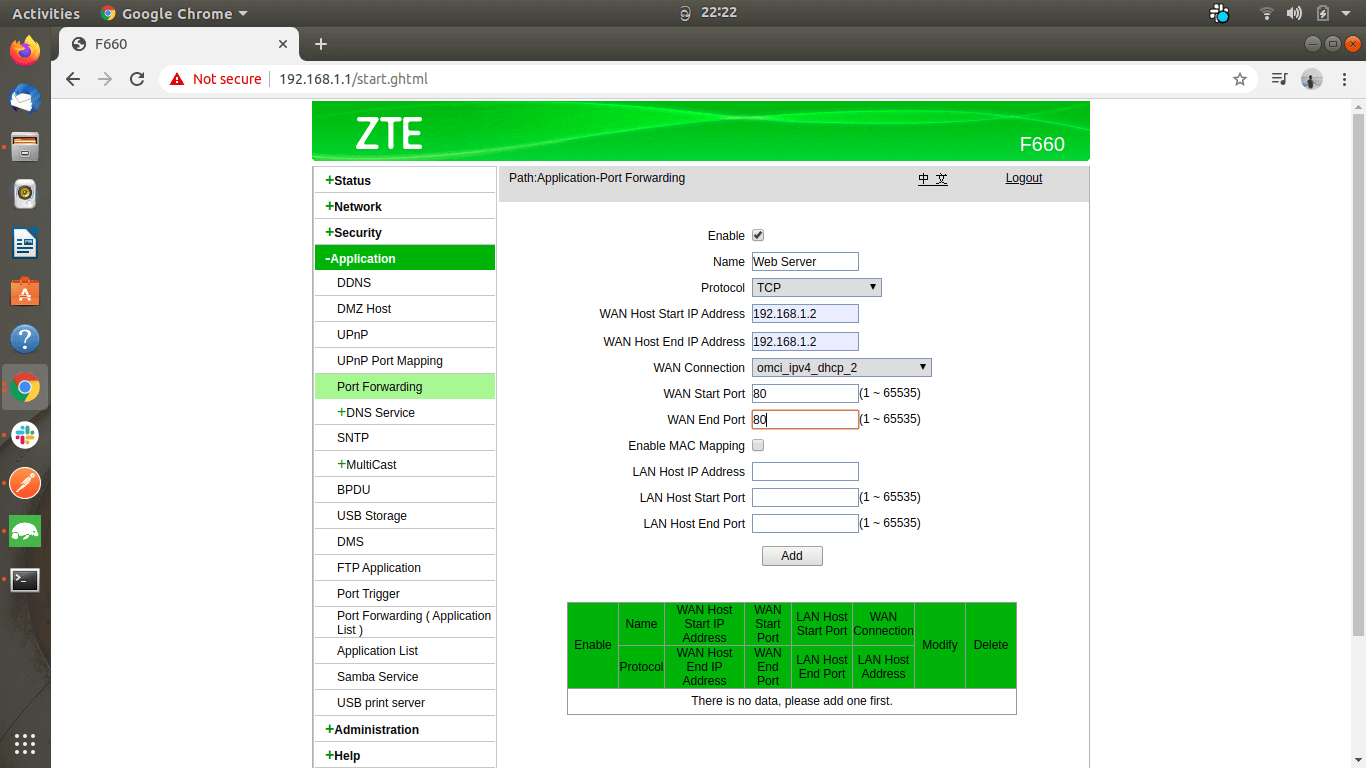
Open the port forwarding settings panel. Depending on the router model and firmware you use, its location may be different. For a ZTE router, you’ll find it under the Application Tab as “Port Forwarding.”
Step 3
Enter the private IP address of the device connected to the WAN.
Step 4
Choose a port from 1,000–to 65,000 and enter its internal and external port numbers. Both ports don’t necessarily need to match; the devices need to recognize each port and use the relevant port when initiating the connection.
Step 5
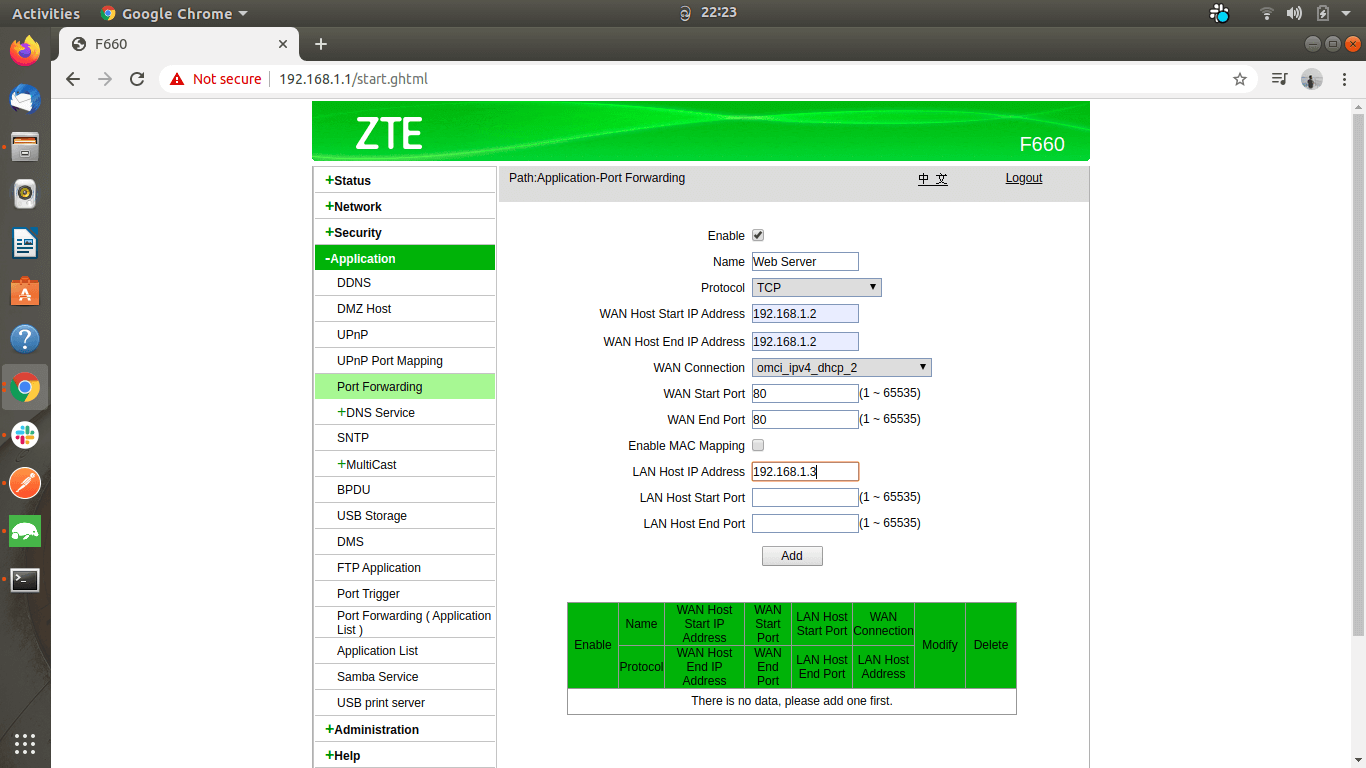
Enter the private IP address of the device you need to forward the messages (that are received from the internet).
Step 6
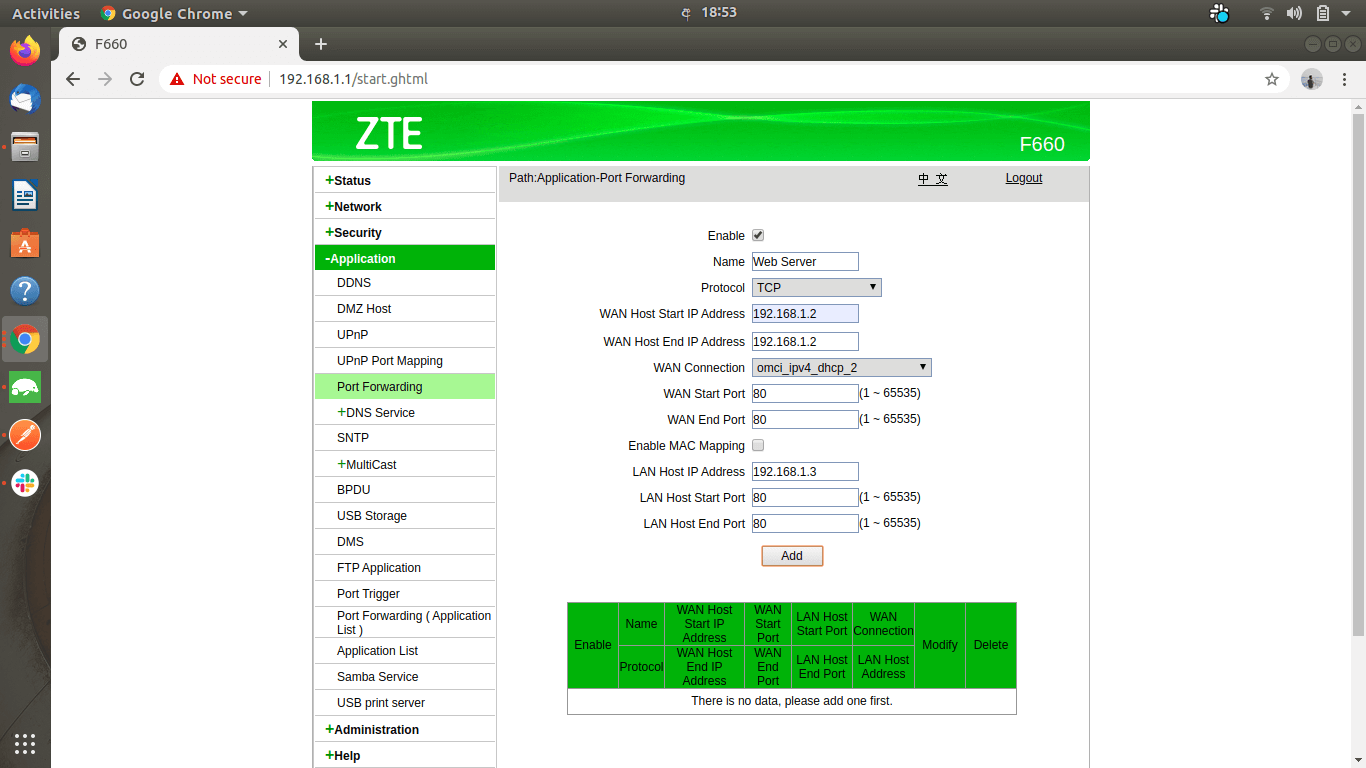
Select the port number of the LAN-connected device that you need to forward the traffic to.
Step 7
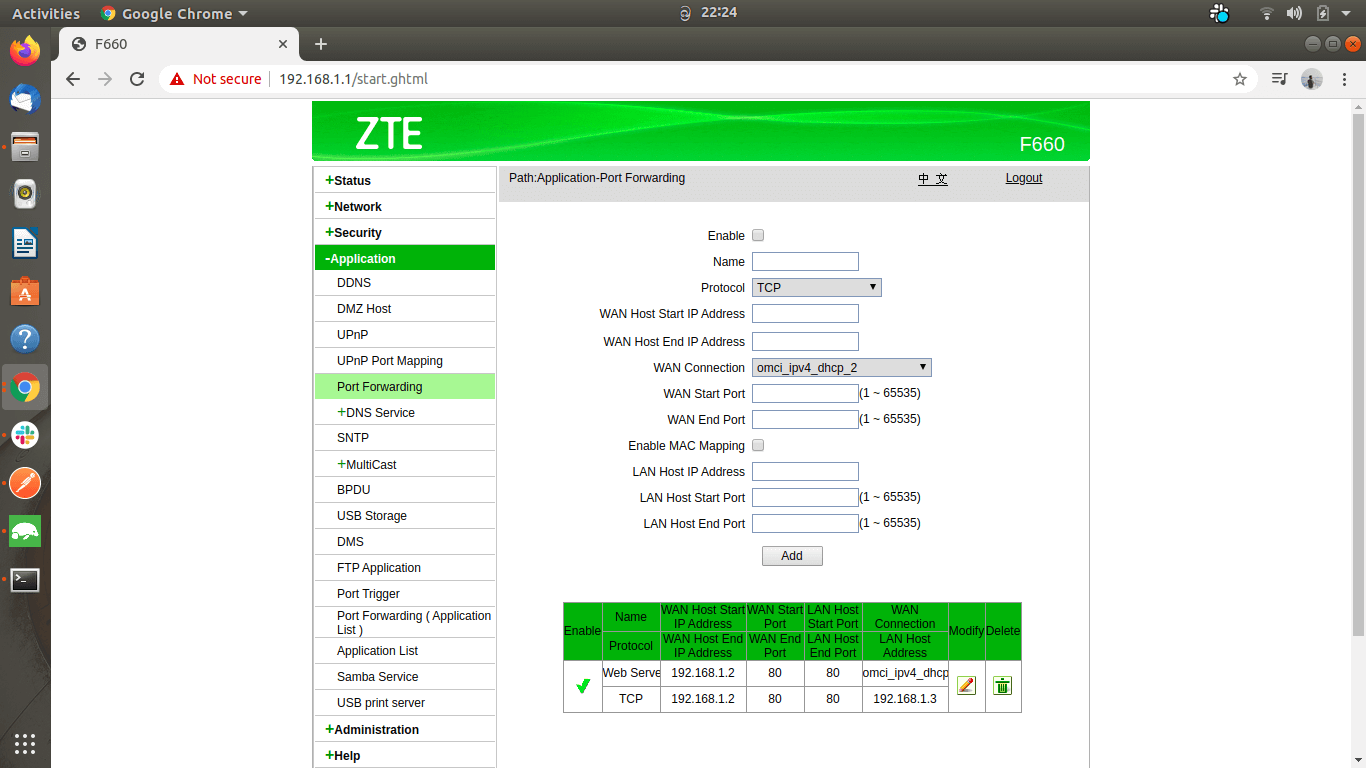
After adding the configuration, your interface will appear as follows:
Step 8
Finally, you can edit an already added configuration however you like.
Step 9
Great! Now you can access your home network device. Just use the public IP address of your router to integrate with the relevant port. Enter “What is my IP” on the Google search bar to find your public IP address.
Here’s what such a request would look like to put things into perspective. Let’s assume that your router’s IP address is 987.654.321, and you want to connect to your laptop on port number 4444. Your router’s request through the port-forwarding protocol would look like this: 987.654.321:4444. That’s your router’s IP address with the extension of the port number at the end.
Port Forwarding with VPN
The second approach to port forwarding is through a good VPN service and app. This may help you access your VPN server through the internet. Some VPN providers have features that allow you to implement port forwarding and choose which port you want to use, configuring its use simultaneously.
Not all users may find port forwarding with VPN useful, but it’ll certainly come in handy in certain situations:
- Accessing the home network remotely.
- Boosting server and home network security. Advanced users can use this feature to set up secure servers and home networks. For example, if you’re a business owner, you can use this feature to allow employees to connect to different servers. They set up port forwarding via VPN, preventing anyone from accessing those servers without a VPN. Now, you can say goodbye to intruders.
- Torrent seeding. Allowing other users to connect to your torrent client and download files is called seeding. With a VPN and port forwarding, you can speed things along.
Step-By-Step Guide to Set Up Port Forwarding with VPN
Follow these easy instructions to set up port forwarding with PureVPN. Please note that these steps may vary depending on your VPN software.
Step 1
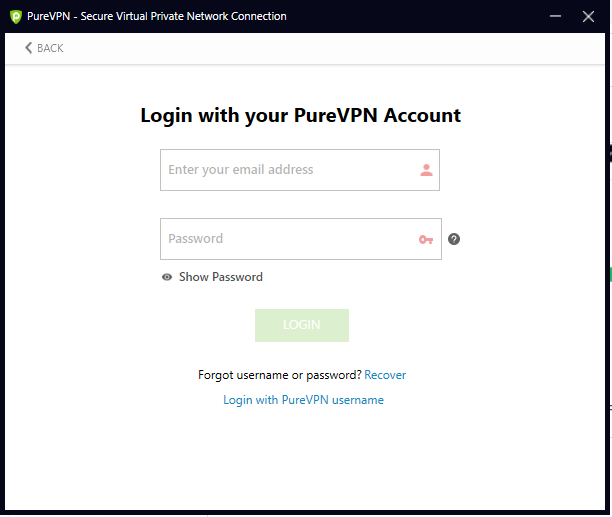
Log in to PureVPN.
Step 2
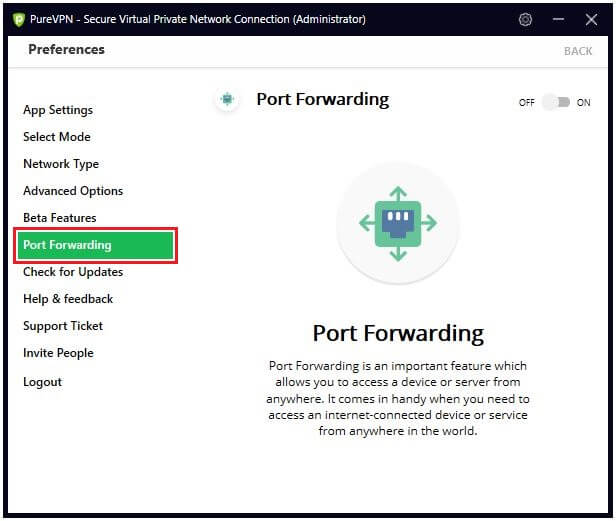
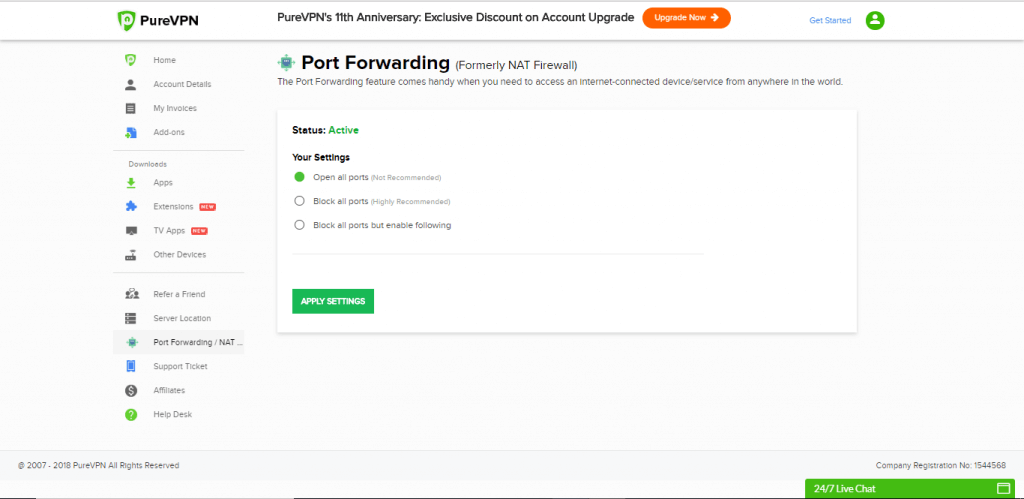
Go to the PureVPN app settings and navigate the “Port Forwarding” tab.
Step 3
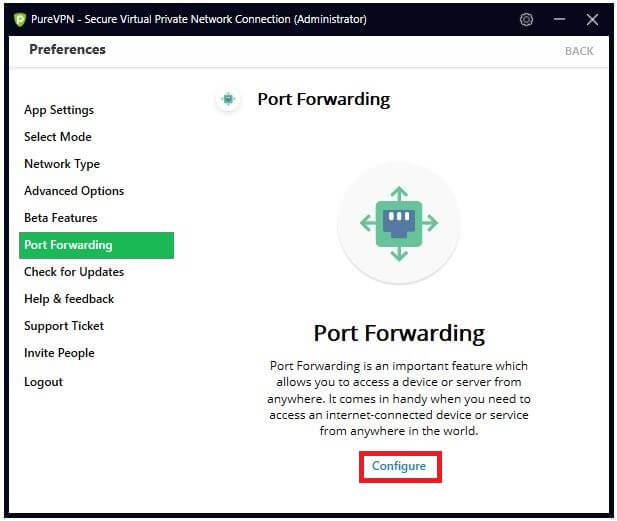
Click Configure.
Step 4
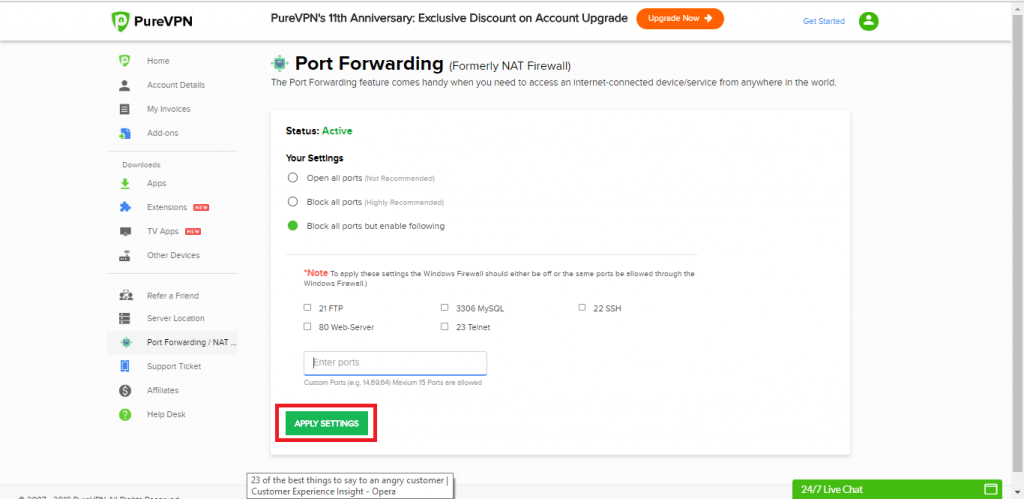
Choose any desired option from the settings:
- Open all ports. This option opens all ports, and you can transfer any data to any desired port.
- Block all ports. This option blocks all ports, and it prevents all internet traffic from the VPN connection from passing through.
- Block all ports but enable specific. Use this option to open specific ports while blocking all others.
Step 5
Apply the settings.
If you’re using any other VPN, complete the first two steps and then enter the following, depending on the type of VPN protocol you have:
PPTP
PPP
Local Port – 1723
Protocol – TCP
GRE channel
Port – 47
Protocol – Other
IPSec VPN
Local Port – 500
Protocol – UDP
IPSec tunnel
Port – 4500
Protocol – UDP
OpenVPN
Local Port – 1194
Protocol – UDP
IKEv2
Port – 500
Protocol – UDP
You can set up a VPN connection on a remote computer using your VPN server’s public IP.
Not all VPN providers are comfortable providing the port-forwarding facility, as opening a port potentially generates a hole in your security.
Like SurfShark and NordVPN, certain providers think the increased security is worth the trade-off, but some users might find it inconvenient when port forwarding is prohibited.
You can use port forwarding with the PureVPN add-on. This eliminates most of the security risks of opening a port to the digital frontiers out there.
Benefits of Port Forwarding and PureVPN Synchronization
Privacy and Security
- Advanced users can use port forwarding to better protect their public IP address and strengthen privacy without letting unauthorized persons enter the network.
A dedicated IP address
- Many organizations prefer to use the same IP address when conducting business online.
- Some organizations may want several dedicated IPs for their different servers. For example, they may want one for development and another for QA purposes.
Pros and Cons of Port Forwarding
Without VPN
Pros
- Wi-Fi router port forwarding is quite easy to configure in that the only requirements are a device’s IP address and a port to listen.
- Almost every router allows you to create multiple rules, even for the same device.
- A user can be directed to their home network without requiring a password.
- This works well with DNS.
Cons
- It would be easy for hackers and other intruders to enter the opened ports and break into your private network.
- Rules must be set for every device.
- To add or modify rules, several site visits would have to be completed.
With VPN
Pros
- Port configuration is fairly simple, requiring only some user information.
- Three security levels are available:
- First level. Only a single port is available with a username and password protection.
- Second level. Encryption allows for all traffic incoming and outgoing from the private network.
- Third level. The security of the internal devices can be enhanced with password protection.
- You can authorize access to all the devices regardless of rules created or not.
- This also works well with DNS.
- Many operating systems vote for most of the popular VPNs out there without additional client software.
- You can increase the connection speed as the VPN port forwarding bypasses the NAT firewall.
Cons
- More steps are required to connect to the internal servers. First, the user needs to log in to the VPN connection and the server.
- This requires complex usernames and passwords, which users can forget easily.
- The encryption process may take more time.
- Some VPN connections require separate software.
Types of Port Forwarding
Three common types of port forwarding include Local, Remote, and Dynamic port forwarding.
Local Port Forwarding
Local port forwarding lets users connect from their local computers to another server or forward data and information securely from a client application running on the same computer as a Secure Shell (SSH) client.
This protocol undergoes all its operations at the SSH level, allowing any application running from this server-side to access services on the SSH’s client-side. Tunneling schemes and procedures use this port forwarding method to achieve the same goal.
This can be used to bypass firewalls that block specific web pages.
Remote Port Forwarding
Remote port forwarding allows applications on the server-side of an SSH Connection to access services on the client side of SSH. Besides SSH, proprietary tunneling schemas use remote port forwarding.
This form of port forwarding allows users to connect from the server-side of an SSH or tunnel to a remote network service located at the client-side of the tunnel.
Remote port forwarding lets other devices access applications in remote servers.
For example:
- Initiating remote desktop sessions is a general use of remote port forwarding. You can accomplish this through SSH, with port number 5900 and the IP address of the destination device.
- An organization’s remote worker hosts an FTP server at their place. To provide access to this server to other employees, they can initiate remote port forwarding via SSH on the organization’s internal devices.
Dynamic Port Forwarding
This protocol gives access to all the information and services on the other side of a NAT firewall by exploiting a firewall pinhole. This method allows your client to connect safely to a secure server that acts as a middle-man, sending and receiving data to one or more destination servers.
Static vs. Dynamic Port Forwarding
As the names suggest, static ports don’t change, and dynamic ports are prone to change each time a new connection is made.
- If you’re port forwarding on a router, static ports are more convenient than dynamic ones, as you wouldn’t have to modify the port setting in your software regularly.
- Some VPNs permit the opening of static ports that don’t change.
- Dynamic port forwarding is more familiar with users, as it’s easier to implement. This lets providers recycle unused ports and reassign them.
- It’s best not to use dynamically assigned ports in torrenting and remote access.
Port Forwarding and Torrenting
Torrent sharing, the file-sharing P2P protocol, is based on seeding and peering.
- Incoming connections allow all other torrent users to connect to your BitTorrent client and download bits and pieces from a certain file.
- The NAT firewall at the VPN router prevents other people from initiating unsolicited new connections. Once the firewall is established, other incoming links are permitted, but this slows down the torrenting and seeding process.
- When a BitTorrent user wants to download a file or pieces of it from you, their client will ask for permission to initiate a connection with you. The system will get a notification, as the NAT firewall doesn’t permit this.
- Once you accept the request, the client can bypass the NAT firewall and create the connection successfully.
- However, this process is impossible if both users have a NAT firewall implemented.
- To use VPNs when torrenting, you need a workaround method to handle the NAT firewall.
A NAT firewall may stop incoming connections, but you can let some of those connections be established and increase the downloading speed with port forwarding.
Risks of Port Forwarding
You might think port forwarding is an excellent way to do your work remotely. But despite its benefits, it’s not without its risks.
- It may allow unsolicited connections to reach your home network. This may include potential hackers and other unauthorized connections.
Example
Let’s look at this objectively using a real-world scenario. Imagine you’re showcasing an exhibition at your private institution.
One of the halls is dedicated to this exhibit, and many scholars outside your institution are invited to visit it. You’ve opened your private institution’s doors to outsiders.
This may still sound fine, as the outsiders would presumably be interested only in your exhibit’s hall. But what if one or more evil intruders disguise themselves as scholars and enter the institution?
What’s to stop them from trying to access the protected facilities given the opportunity?
Similarly, intruders can quickly access your network if you’ve set port forwarding with your camera without taking the necessary protective measures — such as using a strong password.
They may even be able to control the camera footage rather than watch it.
- If you’ve allowed remote access to your PC at home, make sure you close the relevant ports once that access is no longer necessary. Otherwise, leaving those ports open for longer than necessary would be a welcome invitation to eager hackers or those with malicious intent. They’d jump at the chance to gain control over your device.
- Therefore, you must use strong passwords to protect devices you’ve exposed to port forwarding.
- The risk level may vary depending on what purpose you’ve used port forwarding for and what applications you’ve allowed listening to those open ports. This is why many VPNs don’t facilitate port forwarding.
Port Fail Attacks
VPNs that facilitate port forwarding are vulnerable to port fail attacks. What happens here is that an attacker (who’s enabled port forwarding) can expose the actual IP addresses of other users’ devices even if the victims haven’t enabled port forwarding.
Even though many VPN providers fail, they can prevent these attacks by setting up different incoming and outgoing IP addresses on their servers.
Conclusion
If you’re considering port forwarding, you must know the benefits and the risks it poses inside out. With port forwarding, accessing your home network is much easier than before.
Although some VPN providers don’t support port forwarding because of concerns about its security issues, solutions have been put forward to implement security patches that override the native weakness of opened ports.


1 Comment
C
January 3, 2023 2:35 pm
Hi,
In Step 3: Enter the private IP address of the device connected to the WAN. You entered “192.168.1.2”… what is that address? where do I get it from?
Regards,
C.