What Is a VPN Kill Switch and How Does It Work?
A VPN kill switch is a feature offered by some VPNs that automatically disconnect you from the internet whenever your VPN connection fails.
This is extremely useful if you don’t want the website or app you are using to find out your real IP address.
In this guide, I will describe in detail what a VPN kill switch is, how it works, and how you can set one up on various platforms.
If you want to get a VPN that has a kill switch try ExpressVPN.
Quick in-article navigation:
How to set up an OpenVPN kill switch on Windows, macOS and Linux.
There are two types of VPN kill switches:
- Active Kill Switch. This lets you know if you’re disconnected from the VPN. The information is sent to the device to prevent it from connecting to vulnerable networks.
- Passive Kill Switch. More secure than an active kill switch, a passive kill switch blocks your device from sending internet traffic data if the VPN application suddenly stops getting server signals.
You can read more about all of this below.
Additionally, I’ll distinguish between two types of kill switches: active and passive. We’ll also look into common reasons for VPN disconnections, such as server issues, unstable internet connections, and conflicts with firewall or antivirus settings.
If you’re considering a VPN with an integrated kill switch, I recommend trying ExpressVPN.
What Causes a VPN Connection Failure?
Before getting into how to set up a kill switch, let’s briefly discuss why a reliable VPN might fail in the first place. Here are three common reasons:
#1. VPN Server Issues
When your VPN server has physical layer disruptions or internal malfunctions, it’s bound to fail. Not only that, but the server’s poor connection strength also disrupts continuous connection with the VPN. If many users access the server simultaneously and overload it, this could cause issues in the VPN connection.
#2. Unreliable Internet Connection
If you’re constantly switching between networks, your VPN could fail. This can also happen if your internet connection is weak.
#3. Antivirus Settings or Firewall Settings
Some firewalls and antiviruses treat VPNs like a threat, not a security measure. So, even your router could be configured in a way that interrupts the VPN connection and causes it to fail.
How to Set Up a Kill Switch
Yes, a kill switch is a great extra security measure, but few VPNs are equipped with one. So it’s a good idea to know how to set up an OpenVPN kill switch in any operating system.
The goal is to create a security tool that prevents traffic leaks outside the VPN network.
So if your VPN encounters an issue, your personal data and privacy won’t be at risk. The kill switch will instantly sever your internet connection.
How to set Up and OpenVPN Kill Switch on Windows
To set up a kill switch in Windows, it’s better to use routes. Make sure you’re connected to the OpenVPN server of your choice before proceeding with the following steps:
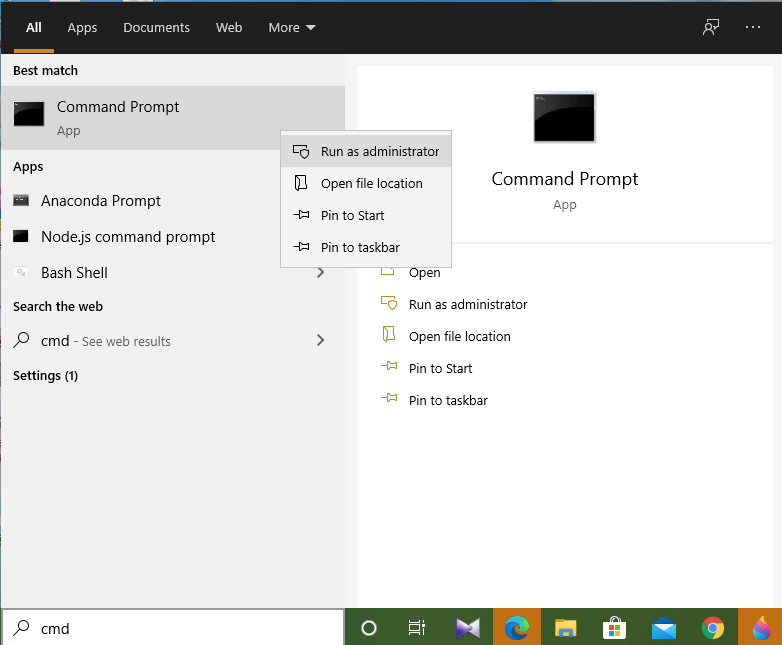
1. Run the Command Prompt with admin rights and select the “Run as administrator” option.
2. Delete the default route when the OpenVPN connection is established.
route delete 0.0.0.0
After successful detention of the default route, the command line interface will output “OK!”
This command will delete the default routing method, making VPN the only access method to the internet. Therefore, your internet connection will be cut off when VPN is inaccessible.
The operating system will remain stasis until it can access that route again. However, this state isn’t persistent. If the router reboots or the adapter is disabled, the settings will be taken to a default state.
For example, if you’re using an unstable Wi-Fi connection, it’s not a very good idea to set up an OpenVPN kill switch using this method.
Also, you can manually restore the default settings:
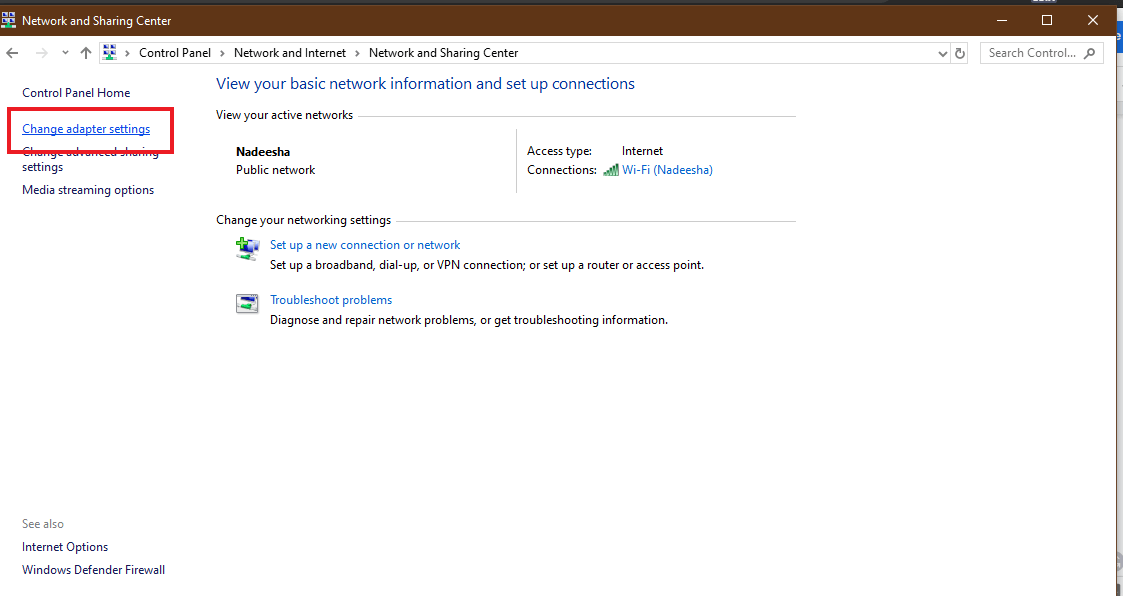
- Go to the Network and Sharing Center in the Control Panel.
- Click Change adapter settings.
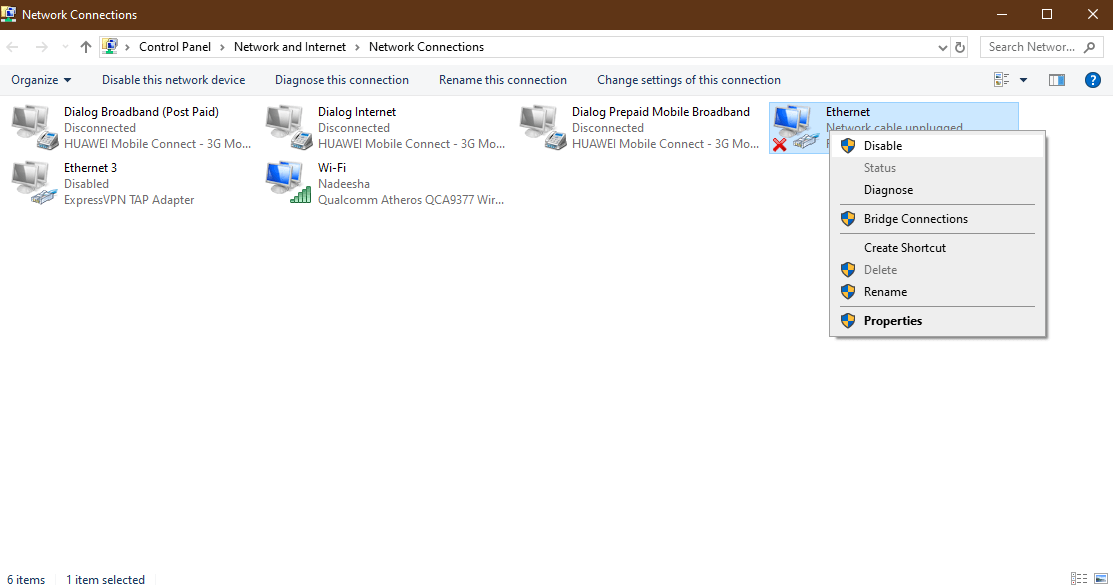
3. Right-click on the network adaptor and click Disable.
4. Then right-click on the disabled network adapter again and click Enable.
How to set Up and OpenVPN Kill Switch on macOS and Linux
Prerequisites
1. Get the IP address of the VPN gateway that this kill switch is intended for.
Using the host command
host
The Mac VPN provider’s hostname can be found in the OpenVPN configuration files.
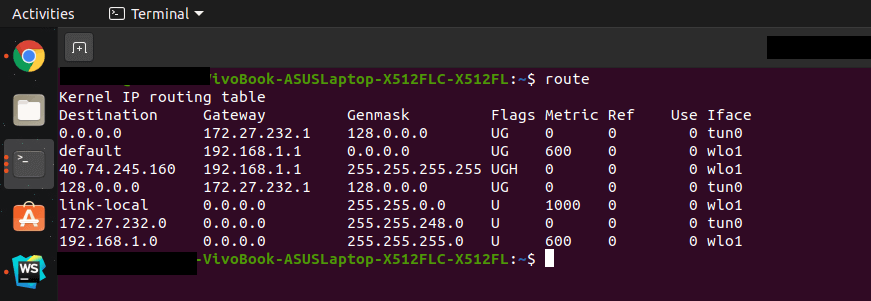
2. Get the network interface name connected to your default gateway and the subnet of the local network.
Using the route command
Root access is needed in a Linux OS to use the above command.
3. Make modifications in the .ovpn configuration file. Change the tun device to -dev tun0 in the client configuration file. Then change the hostnames to IP addresses for the -remote option in the same configuration file.
Now you’re all set to create a kill switch for your operating system.
macOS
1. Use the command-line tool pf to create a kill switch on macOS.
2. Get administrator access with root or sudo to perform the next operations.
3. Edit the configuration of pf. Do this in a terminal window with the config file’s location
nano /etc/pf.conf
4. Block any internet connection through other ports except the VPN port.
block drop all

pass on lo0

pass on utu0

pass out proto udp from any to (insert IP address of your VPN server) port

(add your port)
5. Now save and exit.
6. For the changes to be complete, you’ll have to import the newly added rules:
pfctl – f /etc/pf.conf
7. Now, all you have to do is turn on the firewall:
pfctl -e
Now that the pf is enabled, the kill switch will kick in. The VPN firewall will keep all your internet connections going through the security provider’s encryption.
It will also cut off any incoming and outgoing unencrypted traffic connections. Except for the netblock of the VPN server mentioned in the previous steps, no other internet connection will be possible.
Linux
You can create a manual kill switch or a VPN firewall in two ways in Linux.
Kill switch using iptables
Iptables, a Linux command-line firewall, allows us to manage incoming and outgoing internet traffic with built-in or user-defined rules.
Make sure you back up the current iptables ruleset first. You can do that with
iptables-save
1. Create a new shell script that contains the following ruleset:
iptables --flush

iptables --delete-chain

iptables -t nat --flush

iptables -t nat --delete-chain

iptables -P OUTPUT DROP

iptables -A INPUT -j ACCEPT -i lo

iptables -A OUTPUT -j ACCEPT -o lo

iptables -A INPUT --src 192.168.0.0/24 -j ACCEPT -i wlp6s0

iptables -A OUTPUT -d 192.168.0.0/24 -j ACCEPT -o wlp6s0

iptables -A OUTPUT -j ACCEPT -d 198.51.100.0 -o wlp6s0 -p udp -m udp --dport 1194

iptables -A INPUT -j ACCEPT -s 198.51.100.0 -i wlp6s0 -p udp -m udp --sport 1194

iptables -A INPUT -j ACCEPT -i tun0

iptables -A OUTPUT -j ACCEPT -o tun0
2. Save the created script as iptables-vpn.sh
3. Set the permissions.
chmod +x iptables-vpn.sh
4. Execute the script.
./iptables-vpn.sh
Kill switch using ufw
Ufw is the default firewall configuration tool in Ubuntu. This offers easy and user-friendly ways to build IPv4 or IPv6 host-based firewalls.
1. Install ufw.
apt-get install ufw
Before proceeding, back up your firewall ruleset in case something goes wrong.
2. Add the below commands in a new shell script:
ufw --force reset

ufw default deny incoming

ufw default deny outgoing

ufw allow in on tun0

ufw allow out on tun0

ufw allow in on wlp6s0 from 192.168.0.0/24

ufw allow out on wlp6s0 to 192.168.0.0/24

ufw allow out on wlp6s0 to 198.51.100.0 port 1194  proto udp

ufw allow in on wlp6s0 from 198.51.100.0 port 1194 proto udp

ufw enable
3. Save the script file as ufw-ks.sh.
4. Set the permissions with chmod.
chmod +x ufw-ks.sh
5. Execute the script.
./ufw-ks.sh
Your VPN kill switch is now activated and ready to go.
You can use ufw disable to deactivate the firewall.
Kill Switches Available in VPN Apps
ExpressVPN
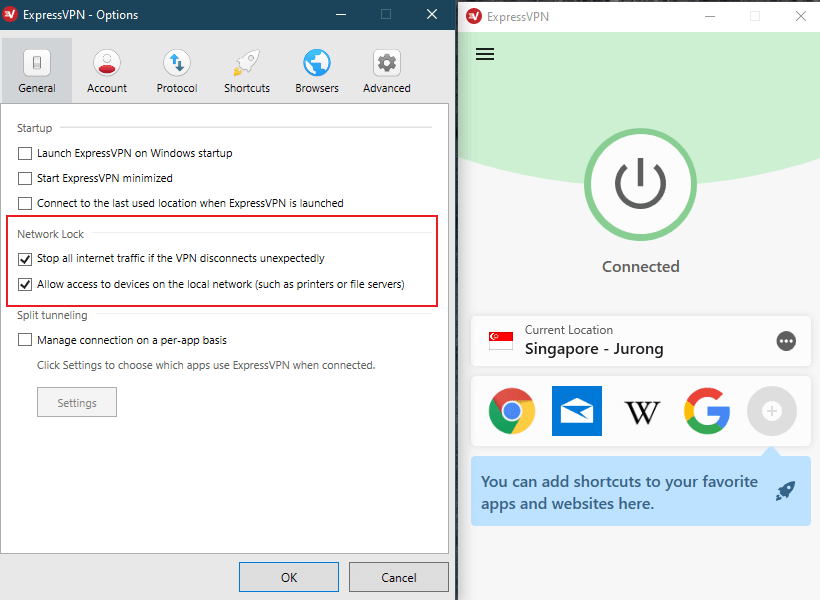
ExpressVPN is by far the best VPN currently available. The kill switch in ExpressVPN is known as the “Network Lock,” and it’s available for all platforms, including Windows, Linux, and macOS. If a sudden failure in ExpressVPN occurs, the Network Lock disconnects you from the internet until the VPN regains its connection.
ExpressVPN is also a great and reliable Android VPN service.
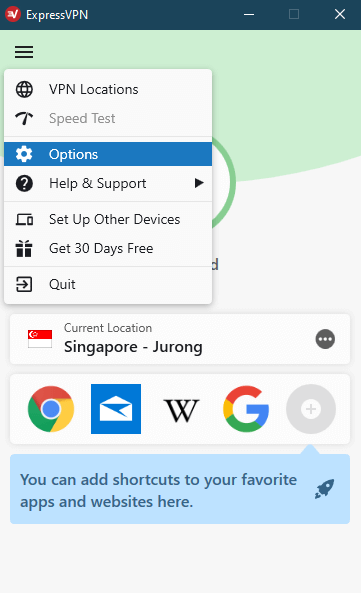
How to set up Network Lock in ExpressVPN
1. Click Options in the menu.
2. Activate the Network Lock.
NordVPN
NordVPN offers several versions of the kill switch. You can disable either system-wide internet access or specific applications only.
Here’s how to activate the kill switch in NordVPN:
- Go to the settings.
- Enable the Internet Kill Switch or the App Kill Switch.
Other VPNs With Kill Switches
These days, more and more VPNs are trying to keep up with the advanced features of the best VPN companies. Here are some that now offer kill switches:
- HMA
- Private Internet Access
- AirVPN
- PureVPN
- SwitchVPN
- IPVanish
Certain VPN servers, like TotalVPN and Buffered, still need to get with the program.
Alternative Ways to Stay Protected After Your VPN Disconnects
You’re not limited to kill switches. Certain third-party applications can also protect your data when your VPN connection is unstable.
VPNetMon
VPNetMon closes specified applications. First, it will try to close the relevant applications. If it’s unsuccessful, then it will shut them forcefully. If your VPN connection goes down, this may prevent you from forming unsecured connections.
VPN Watcher
Until your VPN network connection is restored, VPN Watcher will prevent applications from sending data to the internet. This is a good alternative for the kill switch as a VPN connection monitoring tool.
VPN Lifeguard
This free and open-source software can offer the same services as a kill switch.
Windows Task Scheduler
Windows Task Scheduler uses the built-in event-checking feature in Windows. Here, you have to create a new task. Make that task close the mentioned applications when your VPN connection fails.
Conclusion
These days, it’s virtually impossible for unauthorized users to hack into a VPN server. That’s why they wait for your VPN to fail. So, your best protection is to set up precautions beforehand, just in case hackers want to get at your device.
You have a surefire way to keep your information safe with a kill switch. You can either set a VPN firewall and create a kill switch or trust the most reliable VPNs to do that for you.
If you are looking for more information on VPN security features you should check out our guides on double VPNs, VPN split tunneling and Onion over VPN.
Frequently Asked Questions
Some people found answers to these questions helpful
Who should use a VPN kill switch?
A kill switch is an essential VPN feature that should be used by anyone who cares about their online privacy and security. These include anyone browsing sensitive information, sharing confidential information, activities, dissidents, and even journalists. It is also recommended for torrent users and anyone bypassing geo-restrictions.
How do you test a VPN kill switch?
Launch the VPN and enable the kill switch feature. The kill switch works if you see the site cannot be reached or there’s no internet connection. Then connect to a VPN server and ensure you can access maybe your popular website. Then disconnect from the VPN server (don’t close the VPN app) and try re-accessing the website.
How reliable is a kill switch for a quality VPN?
Reputable VPNs have reliable kill switches. Various VPN providers implement the kill switch using different methods. But they all obey one rule, if the VPN connection drops, they stop traffic flow. The success or failure of the kill switch will depend on the software, the VPN service, your operating system, and even the internet connection.
Why do VPN connections fail?
VPN connections can drop or fail due to many reasons. The common ones include poor internet connection, firewall, and antivirus settings, changes in networks, changes in connection interfaces, and device issues. Connections can also fail due to VPN server downtimes, VPN crashes, VPN routing issues, and blocks of VPN traffic.
Which VPN providers have a kill switch?
Many VPN providers have a kill switch in most of their VPN apps. Almost all Windows VPN clients come with a kill switch. Some providers may not offer the kill switch feature for Mac, Android, and iOS devices. Some popular VPNs with a Kill switch include ExpressVPN, NordVPN, Surshark, Strong VPN, IPVanish, and PureVPN.





3 Comments
Michael Rossall
December 28, 2023 5:03 pm
Thanks for the excellent explanations. I’m a beginner in this field, but you have given me the confidence to pursue it.
Raul
June 4, 2023 7:15 pm
Hi, thanks for the post. I tried to use the command prompt “route delete 0.0.0.0” after open vpn was established. After my vpn was on and I could navigate the internet, I issued the command route delete. Once I did that and got the OK, I could not any longer browse the internet although Open VPN was on. Lost internet connection.
BettyFan
June 30, 2020 9:01 am
If you’re searching for a VPN, I feel like having a kill switch is a must. If you care about your security, you obviously would want to be sure that your VPN works. For example, the VPN I recently got (Surfshark) has a kill switch that cuts off your internet connection.